ImageJ toolbar and clickable table of contents.
Area Selection Tools
Use these tools to create area selections that will be operated on separately from the rest of the image. The contents of an area selection can be copied to the internal clipboard, cleared (to white), filled with the current drawing color, outlined (using Edit>Draw), filtered, or measured. Use the backspace key as a shortcut for Edit>Clear. Use Image>Colors>Color Picker to set the drawing color. Double click on any line tool to change the line width used by Edit>Draw. Use the arrow keys to "nudge" a selection one pixel at a time in any direction.Rectangle
When creating the selection, drag with the shift key down to constrain it to a square. Use the small "handle" in the lower right corner to resize. Use the arrow keys with the alt key held down to change the width or height one pixel at a time. As a selection is created or resized, its location, width and height are displayed in the status bar. Hold the alt key down when moving or resizing to force the location and size to be displayed in pixels.With ImageJ 1.42 and later, hold the control key down (command key on Macs) to resize around the center. With ImageJ 1.43 and later, hold the alt down to constrain resizing to the current aspect ratio.
Oval
Creates an elliptical selection. Holding the shift key down forces the selection to be circular. Use the arrow keys with the alt key pressed to change the width or height. As the selection is created or resized, its width and height are displayed in the status bar. Right click or double click on this tool to switch to the selection brush tool.As with rectangular selections, hold the control key down (command key on Macs) to resize around the center and the alt key to constrain resizing to the current aspect ratio.
Selection Brush
This tool allows you to adjust the shape of an area selection using a circular "brush". To expand a selection, click inside it and drag along the boundary. To shrink it, click outside and drag along the bounday. (With ImageJ 1.38 and earlier, you have to hold down the alt key to do this.) To always add to the selection, hold the shift key down. To always subtract from it, hold the alt key down. Double click on the tool icon to adjust the brush diameter.The selection brush tool shares a toolbar slot with the oval selection tool. To switch to it, double click on the oval tool and check "Enable Selection Brush" in the dialog. Or right click on the oval tool and select "Selection Brush" from the drop down menu.
Polygon
Creates irregularly shaped selections defined by a series of line segments. To create the selection, click repeatedly with the mouse to create line segments. When finished, click in the small box at the starting point (or double-click), and ImageJ automatically draws the last segment.The points that define a polygon selection can be moved or deleted, and new points can be added. To delete a point, click on it with the alt key down. To add a point, click on an existing point with the shift key down.
Freehand
The freehand tool lets you create irregularly shaped selections by dragging with the mouse.
Wand Tool
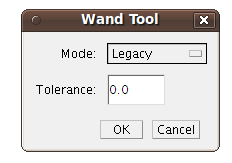
Creates a selection by tracing objects of uniform or similar brightness. If the image is thresholded by the Image>Adjust>Threshold tool, it selects thresholded objects. To trace an object, click inside it (for thresholded objects, you may also click outside to the left of the object). Use the WandAutoMeasureTool macro to outline and automatically measure objects.Double click on the wand tool icon to open the configuration dialog box.
There are three modes: 8-connected, 4-connected, or 'Legacy', plus a tolerance value can be set.
- 4-connected: Only the four neighbors of a pixel are considered neighbors when tracing the object's outline. E.g., the wand does not follow a one-pixel wide diagonal line because the pixels of that line are not four-connected.
- 8-connected: Each pixel is considered to have 8 neighbors. So the wand follows a diagonal line if you click onto it. On the other hand, if you have an area of constant value dissected by a one-pixel wide diagonal line, the 8-connected wand will "jump over the line" and include the other part of that area.
- Legacy: In this mode, operation is similar to that of ImageJ 1.42p and before. To visualize what happens, imagine a turtle that starts moving to the right from where you click, looking for an edge. Once it finds the edge, it follows it until it returns to the starting point. This may sometimes result in selecting background, not foreground. 4- or 8-connected behavior depends on whether the edge found first is considered part of a 1-pixel wide line. For some types of objects, this mode works better if the image is thresholded.
Tolerance: The Wand takes the pixel value where you click as an initial value. It then selects a contiguous area under the condition that all pixel values in that area must be in the range initial_value-tolerance to initial value+tolerance.Composite Selections
Hold the shift key down when creating an area selection and it will be added to the existing selection. Hold down the alt key and it will be subracted from the existing selection. To add a non-square rectangle or ellipse, release the shift key after you start adding the selection.

Line Selection Tools
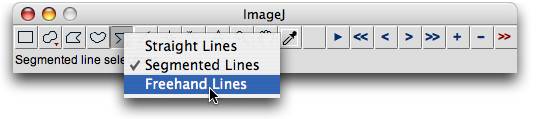
Use these tools to create line selections. Use Analyze>Measure to calculate the length of a line selection. Use Edit>Draw to permanently draw the line on the image. Change the drawing color by clicking in the Image>Colors>Color Picker window. Double click on any line tool to specify the line width. Use the arrow keys to "nudge" a line selection one pixel at a time.The three line selection tools share the same toolbar slot. To switch to a different tool, right click on the current line tool and select the desired tool from the drop down menu.
Straight Line
Use this tool to create a straight line selection. Holding the shift key down forces the line to be horizontal or vertical. When creating a line on a zoomed image, holding the alt key down forces the two points that define the line to have integer coordinate values.With ImageJ 1.42 and later, holding the control key down (command key down on Macs) while moving either end of the line rotates/resizes it about its center. With ImageJ 1.43 and later, holding the alt key down while moving either end of the line keeps the line length fixed.
To spatially calibrate an image, create a line selection corresponding to a known distance (e.g. 10mm), then enter that distance in the Analyze>Set Scale dialog box.
Segmented Line
Create a segmented line selection by repeatedly clicking with the mouse. Each click will define a new line segment. Double-click when finished, or click in the small box at the starting point.The points that define a segmented line selection can be moved or deleted, and new points can be added. To delete a point, click on it with the alt key down. To add a point, click on an existing point with the shift key down.
Freehand Line
Select this tool and drag with the mouse to create a freehand line selection.
![]() Angle Tool
Angle Tool
This tool allows you to measure an angle defined by three points. The angle is displayed in the status bar while the selection
is being created or adjusted. Press "m" (Analyze>Measure) to record the angle in the Results window.
![]() Point Selection Tool
Point Selection Tool
Use this tool to create a point selection, to count objects or to record coordinates.
Click once to create a single
point selection. Shift-click to add more points. Click on a point and drag to move it.
Alt-click on a point to delete it.
Alt-click and drag with the rectangular or oval selection tool to delete multiple points.
Double-click on the point tool icon to display the following configuration dialog box.
![[Point Tool Dialog]](images/point-tool-dialog.jpg)
If Auto-Measure is checked, clicking on an object in the image records its location and intensity and, if Mark Width is greater than zero, draws a mark in the current foreground color. The marks modify the image so it may be wise to work with a copy. Set the mark width to zero to disable marking. Note that color marks are only available with color images or grayscale images that have been converted to RGB. If Auto-Next Slice is checked, ImageJ will advance to the next stack slice after each measurement is recorded.
Use the Edit>Draw command to permanently draw a circular marker on the image at the location of each point. The makers are drawn in the current foreground color using a diameter of Mark Width.
![]() Text Tool
Text Tool
Use this tool to add text to images. It creates a rectangular selection containing one or more lines of text.
Use the keyboard to add characters to the text and the backspace key to delete characters.
Use Edit>Draw to permanently draw the text on the image. Use Edit>Options>Fonts,
or double-click on the text tool, to specify the typeface, size and style.
![]() Magnifying Glass
Magnifying Glass
Click on the image with this tool to zoom in. Alt-click (or right-click) to zoom out.
The current magnification is shown in the image's title bar.
Double-click on the magnifying glass icon to revert to the image's original magnification.
There are 21 possible magnification levels:
3.1, 4.2, 6.3, 8.3, 12.5, 16.7, 25, 33.3, 50, 75,
100, 150, 200, 300, 400, 600, 800, 1200, 1600, 2400 and 3200 percent. When zooming in, press the
shift key to prevent the window from being enlarged.
![]() Scrolling Tool
Scrolling Tool
Allows you to scroll through an image that is larger than its window. When using other tools (except the text tool),
you can temporarily switch to this tool by holding down the space bar.
![]() Color Picker
Color Picker
Sets the foreground drawing color by "picking up" colors from images.
The color of this tool's icon changes to match the drawing color.
Colors can "picked up" from the Image>Colors>Color Picker window using any tool.
Alt-click in the Color Picker to change the background color.
Double-click on this tool to display the Color Picker.
The icon for this tool is drawn in the current foreground color and
the frame around it is drawn in the current background color.
Macro Tools
The tools on the right side of the toolbar are defined by macros in the StartupMacros file, which can be opened using the Plugins>Macros>Startup Macros command. These tools can be customized by editing the StartupMacros file, or replaced entirely using the
Abort Tool
This macro tool aborts the currently running macro or plugin. It is equivalent to pressing the esc key. It is defined in the StartupMacros file by this macro:macro "Abort Action Tool - CbooP51b1f5fbbf5f1b15510T5c10X" { setKeyDown("Esc"); }
Menu Tools
These three menus are are created by macros in the StartupMacros file. They provide convenient access to commands that are also in the main ImageJ menu bar, but buried two or three levels deep. The "Dev" (Developer) menu contains commands frequently used by ImageJ macro and plugin developers. The "Stk" (Stack) menu duplicates the commands in the Image>Stacks submenu. The "Lut" menu lists all the LUTs (Lookup Tables) in the ImageJ/luts folder.
Drawing Tools
The drawing tools are defined by macros in the StartupMacros file. The tools draw (or fill) in the current foreground color, or in the background color if the alt key is down. Set the foreground and background colors by double-clicking on the on the eye dropper (color picker) tool. Double-click on the pencil, paintbrush or arrow tool to set the drawing width for that tool. Double-click on the flood fill tool to select the fill method, either 4-connected or 8-connected.
![]() Macro Toolset Switcher
Macro Toolset Switcher
Use this drop down menu to switch to alternative macro tool sets located in the ImageJ/macros/toolsets folder, or
to revert to the default ImageJ/macros/StartupMacros tool set.