Objective
Learn the basics of batch jobs in FracLac. A "batch job" is a way to process many images without opening them on screen, and save the results without showing them on screen. This is how you would scan a folder of images after you have done some preliminary screening and figured out how you want to analyze them. Note: This tutorial is for binary images, but the general idea works for all images. (See more).
Before you Start
- Install FracLac and ImageJ on your computer.
- Check the objective. If you think this is the wrong tutorial, try the Basic Tutorial and tutorial index.
- Create or find a folder on your computer that you can navigate to containing some binary images you can scan with FracLac.
- Think of all the ways you will be able to get a lot of work done fast!
Overview
Run a Batch Analysis
Start FracLac. Start ImageJ (or restart it) then start FracLac from the plugins menu. For this tutorial, it is recommended you restart ImageJ to set up the default settings.
Set Up a Standard Box Count Scan. On the FracLac panel, depending on the version you have installed, click the purple or purple outlined button for a Standard Box Count (this may say "BC" or "Standard Box Count"). See the images below, or hover over the buttons on FracLac to see details of what they do.

Select the Save Option. The FracLac options panel appears. Select the box to "Save Files" on the bottom of the options panel (refer to the tutorial on saving files for background). If you did not restart ImageJ to do this tutorial, make sure the settings match those on the image below (chiefly make sure it says to use binary images). Then click "OK".Run the scan. When the main FracLac panel reappears, depending on your version, click the blue button that says "Select Files" (hover your mouse over the image to see the button) or the blue-outlined button that says "Batch".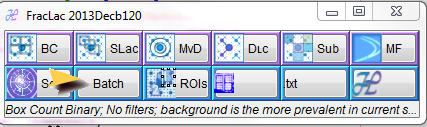

- If a popup asks if you want to use the RoiManager, click "cancel".
-
Select the Save To Folder. A file chooser dialog appears asking where to SAVE results to. Navigate to a place you can save files, and select the folder. FracLac will create a uniquely identified folder within that folder for all of the scan information from each batch job. Click OK or SAVE.Select Files. Another file chooser appears, asking where to FIND the files you want to analyze. In that file chooser, navigate to the folder where your binary images are.-
Hold down
CtrlorShiftwhile you click to select multiple images. For this tutorial, select only binary images that ImageJ can open. - Scan Click OK to scan all of the selected images.
View Results. When it is done processing, FracLac will give you a popup telling where it stored your files. Navigate to the folder and Interpret the results.

Potential Problems
- If you forgot to click the "Save" checkbox, several images and results windows may have appeared on your screen. You can close everything without saving by clicking the button with a window icon on it ("Close Windows") on the FracLac panel. Be aware that this closes ALL open files without asking you to save.
- If the scan cancels or no results files appear in the folder you selected to save to, the images may have been of the wrong type. You can confirm that your settings are correct by reading the information at the bottom of the FracLac panel. In particular, all slices in a stack must be binary if you select stacks with more than one slice.
Beyond the Tutorial
This tutorial is just an overview of how to do a batch job so is limited in many ways, but the option to do batch jobs is actually very flexible. For instance, you can scan grayscale images or do other types of scans by selecting the appropriate options then following the same key steps. You can also choose to see the results on screen, by unselecting the checkbox for saving files.