Special Menu


Start Capturing

Continuously captures and displays video using one of the frame grabber cards directly supported by Image (see list in
Appendix B) or a QuickTime compatible video digitizer, such as the ones built into "AV" Macs and the Power Mac 7500/8500. The capture rate varies from 4 to 30 frames per second, with Power Macs using the PCI version of the Scion LG-3 being the fastest.

Notice how, during continuous capture, the name of this command changes to "Stop Capturing" and "(Live)" appears in the title bar. To "freeze" the image, select "Stop Capturing", type command-g, or click in the Camera window with any tool except the magnifying glass or the grabber. While capturing, you are allowed to change brightness and contrast (directly supported cards only), alter color schemes, and zoom or pan the image. Histograms are continuously calculated and displayed if you select Show Histogram while the Camera window is in "Live" mode.

Newly created Camera windows inherit the look-up table, as well as any spatial or density calibration, of the currently active window. The size of the Camera window is fixed at 640 x 480 for NTSC video and 768 x 512 for PAL. Smaller selections can be saved by creating a rectangular selection and using the Duplicate or Save As commands.

Average Frames

Averages or integrates two or more video frames to reduce time-varying random noise. Averaging will be done only for the current rectangular selection, or for the entire image if there is no selection.

manual24

Number of Frames is the number of frames to be averaged or integrated. Note that there is a possibility of overflow if this value is set to more than 128 since frames are summed in a signed integer buffer with a maximum pixel value of 32,767.

Check Integrate to sum the frames, rather than averaging them. Integration increases image quality and contrast in low light situations. Frames are summed using a 16-bit buffer and the resulting 16-bit pixel values are linearly scaled to a range of 0 to 255. Check Calibrate to set up a calibration function so that approximations of the 16-bit values are displayed in the Info and Results windows.

Check Integrate On-chip to do on-chip integration using the Scion LG-3 and Cohu 4910 series cameras or modified versions of the Dage-MTI CCD72. The camera will integrate on-chip for the specified number of frames and then the LG-3 will capture the integrated frame. On-chip integration requires a special cable, available from Scion, for connecting the integration input of the camera to the LG-3.

Check Video Rate to average or integrate at video rates using the Scion AG-5. With the Scion LG-3, Image will use the LG-3's on-board memory to capture frames to be averaged or integrated at video rates (25 or 30 frames per second). For example, when averaging 32 frames, the frames are captured in about one second instead of 15-25 seconds. It requires 15-25 seconds, however, to compute the average because the LG-3 does not have the AG-5's ability to do video rate arithmetic. The number of frames that can be captured depends on how much memory is installed. A 4MB LG-3 can capture 8 frames at video rates and one with 16MB can capture 32.

Macros are available in the "Video" macro file to continuously integrate and display frames either off-chip, using the Scion AG-5, or on-clip, using the Scion LG-3 and a Cohu or Dage camera. Instructions for using these macros are in the macro file.

If Fix Scale is checked, the values in Min and Max control how integrated images are linearly scaled from 16-bits to 8-bits. If it is not checked, the computed minimum and maximum values are used. The actual minimum and maximum values are always displayed in the Info window.

You can bypass the Average Frames dialog box by holding down the option key. The Average Frames macro (in the "Video" macro file) also bypasses the dialog box, and, in addition, allows you to do averaging or integration by simply pressing the "A" key.

Save Blank Field

Saves (in a window named "Blank Field") a background image that will be used to correct for uneven illumination. The Stop Capturing command will use this reference image to correct shading errors in newly acquired images. It does this by dividing each pixel in the newly acquired image by a correction factor computed for each pixel in the blank field. This correction factor is generated by dividing each gray value in the blank field by the mean gray value.

You can capture a single frame without shading correction by holding down the option key while selecting Stop Capturing. Close the "Blank Field" window to stop doing shading correction.

Video Control

Displays a dialog box that controls how video is captured using the Start Capturing command. One of two dialog boxes is displayed depending on the type of digitizer used.

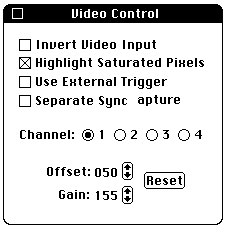
This modeless dialog box is displayed when using a directly supported frame grabber card such as the Scion LG-3. It allows you to interactively adjust the brightness and contrast during "live" capture.
manual25

Images acquired using a frame grabber card are inverted if Invert Video Input is checked.

Checking Highlight Saturated Pixels enables a feature that, during live capture, causes all pixels that over saturate the camera (are too bright) to be displayed in red and all pixels that under saturate the camera (are too dark) to be displayed in yellow.

Use External Trigger enables support for the external trigger feature of the Data Translation QuickCapture and Scion frame grabbrt cards when using the Start Capturing, Average Frames or Make Movie commands. External trigger events are signaled by a 5 volt falling TTL edge on input line 7 of the QuickCapture cable.

Check Separate Sync when using the Scion frame grabber cards and an RGB color camera with separate composite sync output.

Channel allows you to specify which of four input channels is used by the QuickCapture or Scion frame grabber cards. Note that with the QuickCapture card, the input cable labeled "0" is used for channel 1.

Offset and Gain allow you to adjust the A/D offset (brightness) and gain (contrast) of the Scion frame grabber cards. Changes are interactively displayed in live video mode. The objective when using these controls is to optimize the image brightness and contrast. One method for doing this is to enable Highlight Saturated Pixels and interactively adjust offset and gain to just eliminate the saturated pixels within the region of interest. Another method is to display the histogram and interactively adjust offset and gain to spread out the histogram as much as possible.

Several command key shortcuts are useful in conjunction with this dialog box. Command-w closes the Video Control dialog box. Command-g enables or disables live video capture. Command-h displays a histogram, continuously updated during live video. And, if it is active, Command-w closes the histogram window.

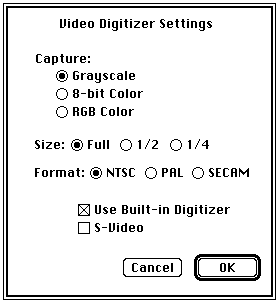
This dialog box is displayed when using a QuickTime compatible video digitizer, such as those built into "AV" Macs.
manual70

To grab color images using the the Start Capturing command, select either 8-bit Color or RGB Color and switch to the System LUT. The Capture Color command grabs 8-bit indexed color images when 8-bit Color is selected and 3-slice RGB stacks when RGB Color is selected. The RGB stack can be saved as a 24-bit color TIFF file by using the Save As command and selecting "TIFF" in the Save As dialog box. Color capture requires a lot of RAM than grayscale capture, so you may need to increase Image's memory allocation.

The Size radio buttons control the size of the Camera window. Set the Format buttons to correspond to the video format being used. Check Use Built-in Digitizer if you want to use an internal digitizer instead an add-on third party digitizer. Check S-Video when using the S-video port.

Video digitizer settings can be saved using the Record Preferences command in the File menu.
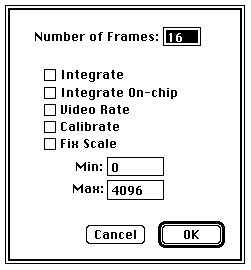
Photo Mode

Erases the entire screen to the current background color and then redraws the current image window without the menu bar, title bar, tool palette, etc. Before selecting Photo Mode, you can change the background color by clicking in the LUT window with the eraser tool. Holding down the option key while selecting Photo Mode causes the image to be drawn starting at the top of the screen using the space formally occupied by the Menu Bar.

Load Macros

Opens a text file containing one or more macros written in Image' s Pascal-like macro programming language. Each macro in the file causes a new command to be inserted at the bottom of the Special Menu. Macros may be assigned to any key, including function keys on the extended keyboard. For example, a macro named "Test Macro [T]" would be assigned to the 'T' key, and one named "Another Macro [F1]" would be assigned to the F1 function key. In both cases, it is not necessary to hold down the command key. Macros can be aborted by typing command-period. When launched, Image automatically loads the macros contained in the file "Image Macros", as long as this file is in the same folder as Image , or in the System Folder.

Load Macros may display an error message referring to a line number in the macro file. If this happens, you can find the offending line by opening the macro file using the Open command and using the Find command's ability to move the cursor to a specified line number.

Example macros for performing the following functions, and many others, are distributed with Image : plotting gel lanes; drawing arrows; generating a sine wave; creating a grayscale step function; printing all currently open images; generating bas-reliefs; clearing outside of the current selection; plotting XYZ coordinate data; importing FITS files; recovering X-Y coordinate data from line plots; and generating an ASCII dump.

The macro programming language is documented in
Appendix A.


[Next] [Contents] [Home]