Loop with step:
The NIH Image macro language is (almost) a subset of Pascal. The macro FOR statement does not have a BY option. Instead, use a WHILE loop with appropriate increment.
Macro 'Loop with step';
Var
i,MyNumber, step:integer;
begin
i:=0; {start the loop at 0}
MyNumber:=GetNumber('Enter ending value:',100,0);
Step:=GetNumber('Enter step:',10,0);
while i
Repeat Loop
Macro 'Repeat loop';
Var
i:integer;
begin
i := 0;
Repeat
{some process}
ShowMessage('This iteration is: ', i);
wait(0.5); {just a delay to see the answer in the Info window}
i := i +1;
until Button;
end;
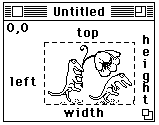
Regions of Interest (ROI)
Before you start looking at macro ROI's an introduction to coordinates is worthwhile. See the picture below for a general guideline. Regions of interest are characterized by 'marching ants' which surround a selection. Coordinates of an image are x,y with 0,0 in the top left of the image. "top" will be the distance from the top in y. "left" will be the distance in x from the left edge. "height" is in y, and "width" in x.
This macro will list your ROI's coordinates.
Macro 'Coordinates';
Var
left, top,width,height:integer;
begin
GetRoi(left,top,width,height);
If width = 0 then begin
putmessage('no ROI exists');
exit;
end;
ShowMessage('ROI is ',left,' x units from the left','\',
width, ' x units in width','\',
top, ' y units below the top edge','\',
height, ' y units in height');
end;
Getting ROI information
GetRoi(left,top,width,height)
You will want to call this macro routine if you need any information about the current ROI. The routine returns a width of zero if no ROI exists.
ROI creation
SelectAll
The Selectall macro command is equivalent to the Pascal SelectAll(true), which selects all of the image and shows the ROI's 'marching ants'.
MakeRoi(left,top,width,height)
This is as straight forward as the name implies.
MakeOvalRoi(left,top,width,height)
Not terribly differing to implement from MakeROI. If you want a circular ROI set width and height to the same value. See the example below.
Altering an existing ROI
MoveRoi(dx,dy)
Use to move right dx and down dy.
InsetRoi(delta)
Expands the ROI if delta is negative, Shrinks the ROI if delta is positive.
Other routines involving ROI's
RestoreROI,KillRoi
These are opposities.
Copy,Paste,Clear,Fill,Invert,DrawBoundary
Detecting press of option, shift and control keys
The macro "KeyDown(key)" (Key = 'option', 'shift', or 'control') returns a boolean true or false. It returns TRUE if the specified key is down. The example macro below can be run on any stack, using shift to delay more or control to delay less.
macro 'Animate Stack';
var
i,delay:integer;
begin
RequiresVersion(1.56);
i:=0;
delay:=0.1;
repeat
i:=i+1;
if i>nSlices then i:=1;
Wait(delay);
SelectSlice(i);
if
KeyDown('shift')
then delay:=1.5*delay;
if delay>1 then delay:=1;
if
KeyDown('control')
then delay:=0.66*delay;
if
KeyDown('option')
then beep;
ShowMessage('delay=',delay:4:2);
until button;
end;
Measurement and rUser Arrays
Currently you can not declare your own arrays but you can store macro data and results in what is called the rUser arrays.There are actually many arrays available to the macros, but of only several types:
1) Measurement, but user configuarable, rUser arrays.
2) NIH Image measurement results arrays
3) Built in NIH Image arrays
4) LineBuffer array (image data array)
Here are the specific examples of these
1) rUser1, rUser2
2) rArea, rMean, rStdDev, rX, rY, rMin, rMax, rLength, rMajor, rMinor, and rAngle.
3) Histogram, RedLUT, GreenLUT, BlueLUT, xCoordinates, yCoordinates, Scion, PlotData
4) LineBuffer
You may write to the rUser arrays simply as:
rUser1[1]:=SomeNumber;
rUser2[1]:=SomeOtherNumber;
And similarly retrieve as:
SomeNumber := rUser1[1];
SomeOtherNumber := rUser2[1];
If you have more than two sets of data which you'd like to keep, and because there are only two rUser arrays, then you can access other macro arrays. However you will need to be careful because these arrays are affected by the Measurement command and the index of the counter (rCount). You could easily write over your data without knowing. An example use of measurement arrays outside the intended use is a snipet of code from the Export look up table macro:
for i:=0 to 255 do begin
rArea[i+1]:=RedLut[i];
rMean[i+1]:=GreenLut[i];
rLength[i+1]:=BlueLut[i];
end;
Here rArea, rMean and rLength are used for Red, Green and Blue instead of area, mean and length.
rCount, SetCounter, ResetCounter
The index of the measurement counter is stored in rCount. The index could also be described as the last value seen in the index column of the results window (Show Results). Run this macro to see measurements and the counter (rCount) value.
Macro 'rCount explaned';
Var
i:integer;
begin
ResetCounter;
SetOptions('Mean');
MakeRoi(0,0,5,5);
for i := 1 to 10 do begin
Measure;
MoveRoi(5,0);
end;
ShowResults;
ShowMessage('The final index in the results window is the value of rCount','\\',
'rCount value is: ', rCount);
end;
Issuing the ResetCounter command will allow overwriting of all previous measurement data. You can also use the SetCounter command when you want to display a set of your own data which is not dependant upon issuing the measure command. An example would be:
Macro 'SetCounter example';
Var
left,top,width,height:integer;
begin
ResetCounter;
SetOptions('rUser1');
SetPrecision(3);
SelectAll;
GetROI(left,top,width, height);
rUser1[1] := width;
rUser1[2] := height;
rUser1[3] := height/width;
SetCounter(3);
ShowResults;
end;
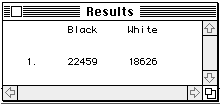
Placing macro data in the "Results" window
If you have particular information, data, calculated results, or any type of numeric data which you want to keep, you can redirect it into the Results window. Use the SetUser label commands to title your field name. The rCount function keeps the current index of the measurement counter. Since rUser1 and rUser2 are arrays, you specify the index of the array with the rCount value. See below.
macro 'Count Black and White Pixels [B]';
{
Counts the number of black and white pixels in the current
selection and stores the counts in the User1 and User2 columns.
}
begin
RequiresVersion(1.44);
SetUser1Label('Black');
SetUser2Label('White');
Measure;
rUser1[rCount]:=histogram[255];
rUser2[rCount]:=histogram[0];
UpdateResults;
end;
Saving results data to a tab delimeted file
You can also save data from the macro, to a tab delimeted text file by adding several
commands in your macro:
SetExport('Measurements');
Export('YourFileName');
Operating on each image in a stack (SelectSlice)
By using a loop (for i:= 1 to nSlices) you can operate on a series of 2D images. The nSlices function returns the number of slices in the stack.
macro 'Reduce Noise';
var
i:integer;
begin
if nSlices=0 then begin
PutMessage('This window is not a stack');
exit;
end;
for i:= 1 to nSlices do begin
SelectSlice(i);
ReduceNoise; {Call any routine you want, including UserCode}
end;
end;
See the series of stack macros distributed with the Image program for more examples.