Accessing bytes of an image
The macro commands GetRow, GetColumn, PutRow and PutColumn can be used for accessing the image on a line by line basis. These macro routines use what is know as the LineBuffer array. This array is of the internally defined type known as LineType. Pascal routines such as GetLine use the LineType. If you plan on accessing 'lines' of the image within your macro, it would might be worth your while to examine the pascal examples in the pascal section. After looking at these, you probably will see how to use the LineBuffer array in a macro.
First look at the definition of LineType. LineType is globally declared as:
LineType = packed array [0..MaxLine] of UnsignedByte;
Naturally, UnsignedByte has been type defined as:
UnsignedByte = 0..255;
The example below is a macro which uses the linebuffer array. If you are interested in using a macro to get at image data, this example should be fairly clear.
Macro 'Invert lines of image';
var
  i,j,width,height:integer;
begin
  GetPicSize(width,height);
  for i:=1 to height do begin
     GetRow(0,i,width);
     for j:=1 to width do begin
       LineBuffer[j] := 255-LineBuffer[j];
      end;
      PutRow(0,i,width);
  end;
See the pascal section for examples of reading from disk (non-image data) to User arrays.
Batch Processing
It's easy to write a macro to process a series of images in a folder as long as the file names contain a numerical sequence such as 'file01.pic', 'file02.pic', 'file03.pic', etc.
macro 'Batch Processing Example';
{
Reads from disk and processes a set of images too large to
simultaneously fit in memory. The image names names must be
in the form 'image001', 'image002', ..., but this can be changed.
}
var
  i:integer;
begin
  for i:=1 to 1000 do begin
      open('image',i:3);
     {process;}
      save;
      close;
   end;
end;
Avoiding a macro dialog box
From wayne@helix.nih.gov (Wayne Rasband) reply on nih-image@soils.umn.edu
You should be able to process many files and only have to see one dialog box. For example, only one dialog appears when you run the following macro as long as 'A', 'B' and 'C' are in the same folder.
macro 'test';
begin
   Open('A');
   Invert;
   Save;
   Close;
  Open('B');
Another way to avoid the dialog box is to use full directory paths as in the following example.
macro 'test';
begin
  Open('hd400:images:A');
  Invert;
  Save;
  Close;
  Open('hd400:images:B');
  Invert;
  Save;
  Close;
  Open('hd400:images:C');
  Invert;
  Save;
  Close;
end;
In V1.55 and above, you can use a full folder path [.e.g., SaveAs('HD400:My Images:mage001')] and the dialog box will not be displayed.
TickCount
From wayne@helix.nih.gov (Wayne Rasband) reply on nih-image@soils.umn.edu
According to "Inside Macintosh", ticks are counted at the rate of 60 per second. You can varify this by running the enclosed macro and timing the interval between beeps.
macro 'TickCount Test';
{"Beeps" every 10 seconds}
  var
     interval,ticks:integer;
begin
  interval:=600;
  ticks:=TickCount+interval;
  repeat
    if TickCount>=ticks then begin
      beep;
      ticks:=ticks+interval;
    end;
  until button;
end;
Placing time and date into your data
If you desire date/time in your results you can create a separate text window which will include date and time. You can copy other results (from Show Results) to this window afterwards.
macro 'Date and time to window';
var
   year,month,day,hour,minute,second,DayOfWeek:integer;
begin
   GetTime(year,month,day,hour,minute,second,DayOfWeek);
   NewTextWindow('Data measurements',500,600);
   SetFont('Monaco');
   SetFontSize(12);
   Writeln('Data Analysed - ',month:2,'/',day:2,'/'year-1900:2,' at '
         ,hour:2,':',minute:2);
   Writeln('');
end;
PlotData notes
From reply of jy@nhm.ic.ac.uk on nih-image@soils.umn.edu
>Does anyone know of an easy way to get the actual points in x,y coordinates and
>the values at each point from the profile plot data using macros?
Image 1.54 introduced a new command to +/- allow this:
"A command was added to the macro language for making profile plot data available to macro routines. It has the form "GetPlotData(count,ppv,min,max)", where count is the number of values, ppv is the number of pixels averaged for each value, and min and max are the minimum and maximum values. The plot data values are returned in a built-in real array named PlotData, which uses indexes in the range 0-4095. The macro "Plot Profile" in "Plotting Macros" illustrates how to use GetPlotData and PlotData." [from the changes file]
To help answer your question further....
1. For a count value of n the PlotData array will have meaningful values from 0 to n-1 (higher array values are accessible but will contain old/meaningless results).
2. Count is equal to the line length, in pixels, rounded to the nearest integer value. But...
3. Substantially more pixels are usually highlighted by a line selection, and this seems to have only an approximate corelation with the pixels used by PlotData.
4 The PlotData array contains real-numbers (not integers) which presumably are derived from a weighted average of pixels rather than being the values of single pixels - even when ppv is 1. Because of this it is not possible to relate PlotData values to single locations.
5. My conclusion after some experimentation is that;
after GetLine(x1,y1,x2,y2,lw);
and GetPlotData(count,ppv,min,max);
The following function will probably return the centre of the location used to derive PlotData[c]:
ypos:=y1+(c+0.5)/(count)*(y2-y1);
xpos:=x1+(c+0.5)/(count)*(x2-x1);
Calling user written pascal from a macro
Image allows you to call by name user developed pascal routines from a macro which you write. Outlined below are example steps you can take to achieve this. You can pass into your pascal procedure up to three extended values. If you don't have any values to pass than pass a zero or any other value.
Step 1:
Write a macro or macro procedure which calls UserCode(n,p1,p2,p3). Be sure to pass values for n, p1, p2 and p3. The example below will call a routine in User.p to add and display two numbers. Note that n equals 1 in this call, because the routine calls the 1st UserMacroCode. This is further explained in step 3.
macro 'Add two values';
var
       NoValue:integer;
       ValueOne,ValueTwo:Real;
begin
       NoValue := 0;
       ValueOne := 2.0;
       ValueTwo := 3.14;
       UserCode('AddTwoNumbers',ValueOne,ValueTwo,NoValue);
end;
Step 2:
Write a pascal routine in the User.p module. Again, this example simply adds two numbers and shows the result in the Info Window.
procedure
   AddTwoNumbers (Value1, Value2: extended);
 var
   str1, str2, str3: str255;
   Result: extended;
begin
  Result := Value1 + Value2;
  RealToString(Value1, 5, 2, str1);
  RealToString(Value2, 5, 2, str2);
  RealToString(Result, 5, 2, str3);
  ShowMessage(Concat('1st number = ', str1, cr, '2nd number = ', str2, cr, 'Added result = ', str3));
 end;
Step 3:
Modify the UserMacroCode procedure to call your pascal procedure. The UserMacroCode procedure is found at the bottom of the User.p module. Because you could call differing UserCode routines, the string you pass into UserCode selects which routine you would like to call. This example checks to see if you have passed the string 'AddTwoNumbers'.
procedure UserMacroCode (str: str255; Param1, Param2, Param3: extended);
 begin
  MakeLowerCase(str);
  if pos('addtwonumbers', str) <> 0 then begin
    AddTwoNumbers(Param1, Param2);
    exit(UserMacroCode);
   end;
  ShowNoCodeMessage;
 end;
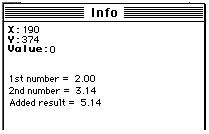
Step 4:
Compile your modified version of Image. Load your macro and execute away. Shown below is the result of the entire example.