Intensity Profile
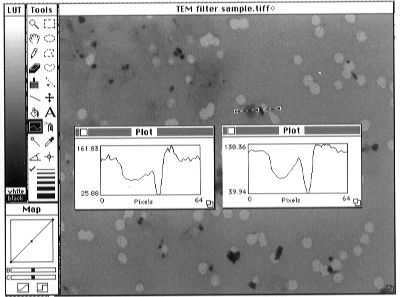
- Figure 8-- Illustration of the line profile tool. -- plot across the filter, a pore and a particle. Left inset - plot of single pixel values along line as shown. Right inset -
plot of averaged pixel values along a 'fat' line (not shown), with width of bottom
line in the line width tool.
An often used analytical tool for micrographs is the intensity profile. In NIH
Image, the profiles are obtained using the profile plots tool (the graph icon in
the Tools window), which is controlled by the line width tool (the lines of varying
width in the lower right of the tools window). Working with the log of the sample image,
Fig. 8, shows two profiles across a pore, one showing single pixel values along the line
and the other the averages of several pixels along the fat line. To observe the
profiles, one after the other, click on the thinnest line of the line width tool
to select this thickness - a check mark will appear to the left of this line. Then click
on the line profile tool. Finally, move the cursor to the position in the image
for one end of the line to profile, and holding down the mouse button, drag the
cursor to the other end of the line and release the mouse button. The 'rubber band line'
will show the location for the line of the profile while the mouse button is down,
and then will be replaced by a 'marching ants' line and a plot window upon release
of the mouse button. To see the averaged profile, leave the marching ants line in the
window, click on the fat line (bottom one in the line width tool) and then invoke
the Analyze - Plot Profile
command again. The former plot profile will be replaced by a new one reflecting
the averaging of pixels across the width of the fat line. The 'marching ants'
line will also be replaced by a 'marching ants' rectangle outlining the area of
the image represented in the plot. Note that moving the cursor around the Plot window will
display the position and amplitude of the plot in the Info window. The marching
ants always represent a selection area in NIH Image, which can be erased by selecting
a selection tool (the rectangular one for example), and clicking anywhere within the
image.
[Index]
[Next]